Sunday, 17 June 2012
1/76 Airfix: WWI Male Tank
Derby Model Club collection British Armourd Vehicles 21st June 2012
This is a simple build made into a diorama for the club collection.
1/48 Hobby Boss: A-10 Thunderbolt II
Thought I would try a 1/48 scale aircraft so I chose one of my favourites - the A-10. This kit is in the 2 seater experimental design, which never actually entered service. Was supposed to be in an aircraft grey colour, but I wasn't confident at weathering a single colour so chose a 3 colour camouflage design.
This kit was OK to build. less fiddly bits with the larger scale, but required several areas of filling and sanding. Painting was fun, sprayed one green colour then covered in play dough to get the camouflage design and repeated twice.
I wont be attempting this scale again soon as it takes an age and there is so much detail to do.
Not the best model I have done, but it is OK.
1/72 Hasegwa : A-7 Corsair II
Bought this on offer from Model =Zone. was origionally going to enter it into the 'Korea' Competition, but on research, found that it entered service into Vietnam.
Still, it was a good quality kit and simple build. I shyed away from varnishing it as the underside was painted with tamiya white spray paint.
1/72 Academy: Republic F-84E Thunderjet
Derby City Model Club competition 19th July 2012 Korea
Bought this from Modelzone for the competition. It was a quality kit and simple build. I have switched to Acrylic paint and I think it is easier to use and gives a better finish. Painted in Tamiya silver and weathered with a Tamiya kit, the finish looks great and this is by far the best aircraft kit I have built to date. The kit comes with a stand which is an added bonus.
The only think I didn't do was add the missiles as they looked unrealistic.
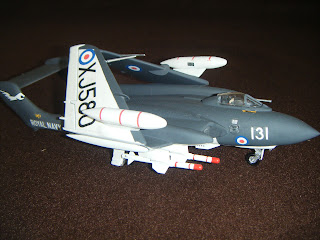
1/72 China Eastern: de Haviland Sea Vixen
Derby City Model Club Competition 17th May 2012 - Placed 3rd
This was built as per box instructions for the Model Club Competition ' British Jets'. I decided I wanted to do a sea Vixen as it looks different to most aircraft. Sourcing it was difficult and this one was won on Ebay.
Building was simple and straightforward. Painting was hard as I have discovered white paint is difficult to get right. This one is painted with Wilko's white primer. I have learnt not to varnish over white paint as it turns a yellow colour.
Pleased with 3rd place for my first model competition!
Saturday, 28 April 2012
Diorama3:'An Eastern Front'
Used:
Model Art Ukrainian village house
Tamiya German Hanomag Sdkfz 251/1
Tamiya German Pak 40 Anti Tank gun and crew
Tamiya German Machine Gun Troops
Tamiya Sandbags
This has been work in progress for some time. I finished th e Machine gun troops and Anti Tank crew some time a go. The Ukrainian building has taken some time to finish, but it has been good to work with.
With the ModelArt kits, I find that there is a lot of reworking required to finish the preformed moulded kits. Once it has all been cut out, all the sections fit together on edges. This requires lots of PVA glue, masking tape and plenty of filler after it has dried. I haven’t followed the picture exactly, aas the upstairs window is supposed to be set back in the roof. I had trouble making it all fit together, but it has turned out ok.
The Sdkfz was built as standard instructions. This is the first time I have washed the sprews first ( which every one recommends to do) . I also coated it in primer before construction.
I never know what is the corrct way to construct kits. Is it to prime and paint on the sprews? This can be tricky as the primer can become tacky when handling. Priming and painting when all filleted together is ok for the main-larger base, but it can be tricky to paint small parts after they have been fitted. On some recent kits I have painted without using primer. This si sometimes trick and requires several coats as the paint doesn’t bond too well to the plastic….Any advise would be useful!
1/72 Airfix F-86F Sabre
Derby City Model Club Competition 19th July 2012 Korea
Built straight from the box this is the new Airfix sabre Kit. I must say it is a very good quaility kit and the decals make it look great. Simple build and painted in silver this model looks great
1/72 Revell: Supermarine Walrus MKI
Derby City Model Club Collection 19th April 2012
This is a Revell 1/72 Supermarine Walrus MKI 'French navy' built for a Model Club Collection.
The kit quality was good and construction simple...until it came to adding the top wing!. This took several attempts and plenty of masking tape. If you look closely, it is not lined up exactly, but I had had enough and it as good as I could get.
The painting was simple as it is all aluminium. I sprayed it and it has come out well. I vanished this model and it has created a good finish. I need to add the wire supports at some stage before the competition and the guns. but that can wait.
1/72 Airfix: Grumman J4F-1 Widgeon V203 of United States Coast Guard
Derby City Model Club Collection 19th April 2012
This is a Airfix 1/72 model built for a Model Club collection. The Kit is a new Airfix design and is of good quality. I built it with ease and tried to take extra care of the details by using filler. I used wall filler, and it hasnt turned out very well - a lesson for thefuture. The painting was fairly simple. Silver and a yellow wing. I airbrushed the silver, but manually painted the yellow and it hasnt turned out very well.
Overall this is below the standard I am aiming for, but it is the first plane I have built for many years
Friday, 9 March 2012
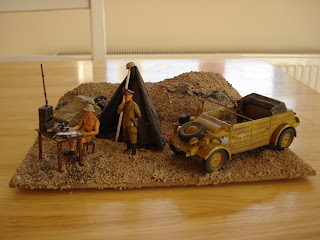
Diorama -'Desert Outpost'
This is a diorama built for a competition in the Model Club. It is a Revell 1/35 kit of a Volkswagen Kübelwagen with 2 soldiers.
Building the kit was very simple and painting it was an ease. There were no colour codes in the instructions, so I have painted by eye and it has come out well. The base was made simply using styrofoam covered in wall filler then sand. The tent was covered with old material to give a more realistic look.
I am please with this diorama, there are a few mistakes an some touching up needed, but it has turned out to be one of the best models I have done.
Tuesday, 14 February 2012
Diorama 4:'broken down'
ModelArt Street
Tamiya Panzerkampfwagen III
Tamiya German Tank crew at rest
Tamiya German machine gun crew on manoeuvre
The story behind this diorama is that there is an army on manoeuvres or retreating through a town east of Germany
This is the first 1/35 scale Diorama I have done. The base was fairly simple to construct using the vacuumed formed ModelArt kit. It took plenty of glue, filler and masking tape to make the ruined building, but it has turned out well. I painted it with a range of colours including oil paint rubbed off with a towel. The look is great and I am especially pleased with the brick work. I changed the green as shown on the box to yellow.
The Tank was built as per the instructions. I painted the base and turret first before adding the accessories. I added some extra accessories including a few sandbags, which were used to defend against shell impact, some netting wrapped around the turret, which looks like camouflage being transported. The barbed wire was made using thin wire with knots wrapped around in intervals. It is curled up as if being transported. The Tank commander that came in the box has been replaced with one form the Tank crew selection who looks to be in a more relaxed pose.
The figures were constructed and painted as per the standard instructions. I added some brown paint to the lower parts of the uniforms to show dirty and experienced soldiers.
Rubble has been added including a few spare weapons and shells I had in stock. The wooden beams were made from coffee stirrers soaked in black paint then dried.
I am pleased with the outcome of this diorama. It has an interesting Tank and several people, and is telling a story. I need to improve the faces of people as these were hard to do and could be better.
Subscribe to:
Comments (Atom)


