Friday, 9 March 2012

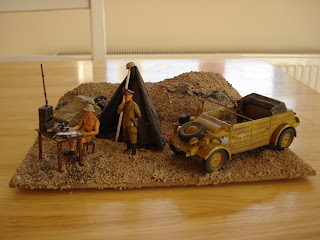
Diorama -'Desert Outpost'


This is a diorama built for a competition in the Model Club. It is a Revell 1/35 kit of a Volkswagen Kübelwagen with 2 soldiers.

Building the kit was very simple and painting it was an ease. There were no colour codes in the instructions, so I have painted by eye and it has come out well. The base was made simply using styrofoam covered in wall filler then sand. The tent was covered with old material to give a more realistic look.

I am please with this diorama, there are a few mistakes an some touching up needed, but it has turned out to be one of the best models I have done.

Tuesday, 14 February 2012

Diorama 4:'broken down'


Used:

ModelArt Street
w/ruined house
Tamiya Panzerkampfwagen III
Tamiya German Tank crew at rest
Tamiya German machine gun crew on manoeuvre

The story behind this diorama is that there is an army on manoeuvres or retreating through a town east of Germany. The Panzer has broken its tracks and so is on the side of the road. The Tank crew are unable to fix it and are sitting around the tank watching the infantry soldiers walking by. There is an annoyed tank member in the background shouting at one of the soldiers walking by.


This is the first 1/35 scale Diorama I have done. The base was fairly simple to construct using the vacuumed formed ModelArt kit. It took plenty of glue, filler and masking tape to make the ruined building, but it has turned out well. I painted it with a range of colours including oil paint rubbed off with a towel. The look is great and I am especially pleased with the brick work. I changed the green as shown on the box to yellow.

The Tank was built as per the instructions. I painted the base and turret first before adding the accessories. I added some extra accessories including a few sandbags, which were used to defend against shell impact, some netting wrapped around the turret, which looks like camouflage being transported. The barbed wire was made using thin wire with knots wrapped around in intervals. It is curled up as if being transported. The Tank commander that came in the box has been replaced with one form the Tank crew selection who looks to be in a more relaxed pose.

The figures were constructed and painted as per the standard instructions. I added some brown paint to the lower parts of the uniforms to show dirty and experienced soldiers.

Rubble has been added including a few spare weapons and shells I had in stock. The wooden beams were made from coffee stirrers soaked in black paint then dried.

I am pleased with the outcome of this diorama. It has an interesting Tank and several people, and is telling a story. I need to improve the faces of people as these were hard to do and could be better.
Sunday, 4 December 2011

Tamiya - 3.7cm Anti-Tank Gun 1/35


This is my first attempt at 1/35 soldiers. I had plans to add this anti-tank weapon to a diorama with some machine gunners and an Ukrainian town house. however, I don't think the quality of finish is good enough for the diorama I have in mind. With more practise, the quality should improve, so for now this gun is ok on a bit of cardboard.

Revell - Krupp Protze Kfz 70 w/3,7 Pak 1/76


Here is a small model I have done which I hope to add to a diorama in the future. It is not weathered yet, but is done to a good finish as per the instructions. I changed the colour of the tyres to add some contrast. I have a sitting soldier to add to the back of the truck at some point.

Wednesday, 16 November 2011

Tamiya 1/35 U.S. M113A2 Armored Personel Carrier


This is my first 1/35 scale model and first Tamiya model. I must say that the quality of the Tamiya is excellent, and there is lots of detail and accessories which justifies the cost. Construction was quick and simple. The size meant no fiddly bits to do. I didn't have any Tamiya paint as I tend to build revell models, so I looked online for the conversions where possible. Otherwise I used desert coloured paint.

I airbrushed the paint on followed by shadings of different colours and tried to add a little sand, dust and rust to some areas. After adding the accessories, I did a final wash with thinned black paint. A bit risky, but the finished look is OK.

I haven't added this to a diorama, as i don't have any 1/35 accessories. I could only put it on a bed of sand, so I haven't bothered.

Next posting will be a diorama...just have to think of what to do.

Friday, 11 November 2011

Diorama 2: ‘Go around’ 1/72


This took an age to finish, but I am really pleased with the end results. It is a diorama portraying a group of US soldiers and Shermans advancing along a road, only to find it blocked and mined. Therefore the squad are forced to find a new route through the field. 

It consists of two Revell Sherman M4A1 and US infantry figures.

All these items and scenery were purchased through an internet auction.

I started by priming everything on the spurs, then  building the two Shermans together finishing them with my airbrush. They looked straight out of the factory, so I had a go at weathering. After looking at tips on youtube, I gave them both a was of thinned black paint, then dry brushed silver to represent paint loss and scratches. The rear Sherman has its hatch open with a infantry soldier with his legs cut off and gun cut out so he looks like he’s made for the tank. The front Sherman has a few twigs collected from my local hedge inserted in the tracks with wall filler, painted brown and decorated to look like it is driving through.

The soldiers were simply primed and painted in army greens and browns. I added some light brown around the boots, legs and jackets to represent a muddy uniform.

The base was made with wall filler to represent the uneven field. The hedge was a long mound of putty with twigs stuck in. Once that was dired I painted it and applied a layer of model soil. The greenery was made with lichen – which loos quite good. The road was a simple layer of model gravel. A light colour to contrast the dark field. The grass verge has turned out ok, but could be better. It is wall filler with bristles from a paint brush  glued in . Some model grass has been added, but I think it is too dark.

Revell: North Sea Fishing Trawler 1/142


I bought this model from an internet auction. It was a simple construction and I again primed the pieces first, painted the hull with a brush and constructed the kit. It was annoying that most of the colours for this kit required mixing others together. The end model has turned out good. The level of detail is a little basic and I again bottled out of trying to weather the finished model. I did not want to spoil the finish.

The two little sailors have red overcoats on – not the recommended bright yellow. This is because I had red paint from the Queen Mary and didn’t want to buy a new tin of yellow for this little amount.